

This is a reprint of a guest tutorial I did for Skip To My Lou's Craft Camp. Enjoy!
Hey, Craft Campers! I'm Larissa Holland of mmmcrafts and I'm glad to be a summer craft counselor again this year. Enjoy my earlier Craft Camp paper projects here and here. This year we will make a silly, flappity-eared puppy card that has a tongue pull tab! It's just the thing to make to say Hi to friends you miss, or just give to someone who could use some puppy love. Are you ready?
First things first. Gather your materials! You need:
- Letter sized sheets of white, blue, yellow, orange and red card stock
- Scraps of white and black paper
- Tacky Glue
- Scissors and/or craft knife (Remember the craft knife is sharp! Be careful!)
- Circle punches in 1 inch and 5/8 inch sizes
- Ruler
- This PDF template
- Printer


Get Started:
1) Download the PDF template, open it, and follow the directions on the template to print on your card stock.
2) Score and cut out all the pieces as directed on the template. "Scoring" is simply making a dent in the paper so it folds easily. I use a ruler and the back of my craft knife* (not the sharp side) to score. You can also use a regular ol' table knife (the kind you use to spread butter on bread) to score the folds. Keep the extra uncut pieces to make a card in opposite colors later!
*Get a grown-up involved if you are using a craft knife. It's sharp!
3) Cut the white piece of card stock in half so that you have two pieces that are 5.5 x 8.5 inches. Fold them in half. You'll use one for this card and have an extra to make another card later.

4) Glue the tongue to the ear piece. Note the writing is facing up on the ears and facing down on the tongue.

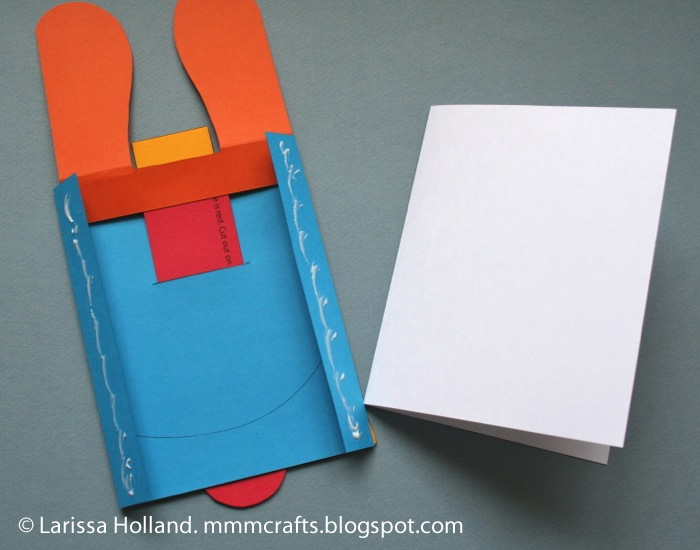
5) Glue the semicircle to the bottom of the blue piece, flush with the bottom edge. Note the text is face down on both pieces.

6) Feed the tongue through the slit from the back.

7) Put glue only on the top and sides of the text side of the head and center it flush against the top edge of the blue.


8) Punch two white 1 inch circles and two black 5/8 inch circles. Make eyes by gluing the black onto the white. Then glue the completed eyes on, being sure they are in a spot that is hidden by the ears when they are folded down.

9) Use a template piece to trace a nose on black paper with pencil. Cut it out and glue to the face.

10) Fold over the blue side flaps toward the back and crease them well.

11) Add glue to the back side of each flap, then attach it to the front of the card you made in step 3. It's easier for me to add the card to the back of the puppy instead of the other way round, but be sure you have the card opening on the correct side.

12) Open the card and fold over the yellow flap between the ears and glue it to the inside cover of the card.

13) Test the ear action! Pull the tongue down and watch the ears flip up! Push the tongue back inside and the ears can fold back down.


14) Using a gel pen or thin magic marker (not a permanent marker - those may bleed through your paper), add the word "PULL" to the lower part of the tongue that shows when the ears are laying down. Add a message to the inside of the ears if you like, for example:
Hi There!
Miss You!
Happy Birthday!
or
Whoa, Nellie!

Tada!
Your Puppy Ears card is now finished! Write a note on the inside of the
card and send some silly puppy love in the mail. This card fits in a 5 x
7 inch envelope.
Please
enjoy this template and tutorial for your personal use! Commercial use
is not allowed. Please don't pin or post any in-progress shots, or
repaste my text. Feel free to pin or post the finished card with a
credit and a link back. Thanks!
That is so CUTE!!
ReplyDeleteawesome...
ReplyDeleteOh, thank you! Your timing is perfect. I am going to make this for my nephdog's birthday next weekend.
ReplyDeleteJ'aime beaucoup !!!
ReplyDeleteBravo
Nadia
So sweet! Happy crafting!
ReplyDeleteThanks, everyone!
ReplyDeletethe cutest!
ReplyDeleteWell, I made this card for Chappy's birthday (using dark and light brown papers to complement the birthday pup) and it was a huge hit! All were impressed with the cleverness of it. Thank you for your talent and your spot-on tutorial!
ReplyDeleteyou are correct
DeletePattylg67, wow, made my day! thanks for the feedback.
ReplyDeleteSaw this on Pinterest a while back, and am finally making it for one of my little friends! Turned out adooorable, I can't wait to send it to him! :)
ReplyDeleteJust loved! And the explanation is so clear!! I think my little daughter will love to see the movement of the ears and will want to make her own card too. Thank you very much!
ReplyDeleteI'm the Editorial Assistant for Fun Family Crafts and I wanted to let you know that we have featured your puppy card! You can see it here:
ReplyDeletehttp://funfamilycrafts.com/puppy-ears-card/
If you have other kid friendly crafts, we'd love it if you would submit them. If you would like to display a featured button on your site, you can grab one from the right side bar of your post above. Thanks for a wonderful project idea!
Hi, Cindy, thanks for featuring the card!
DeleteMeravigliose le tue idee! seguirò con curiosità i tuoi prossimi post!
ReplyDeleteErica
So cute ! I love it ! Thank you very much for sharing !
ReplyDeletemuchas gracias!
ReplyDeleteHello! It seems the PDF link isn't working for me, I wondered if you might be willing to share it by email? My son has requested a dog-themed birthday and I'm attempting to over-achieve and make a few of these as invitations. :) Thanks!
ReplyDeleteHey, Kate. Just sent it. Good luck!
DeleteQue bacana, obrigada!
ReplyDeleteCute~
ReplyDeleteThank you.
Hello! It seems the PDF link isn't working for me, I wondered if you might be willing to share it by email? Thanks!
ReplyDeleteStefanie, I'd be happy to if you'll give me your address.
DeleteHi! I can't also get a copy of the pdf file. Would you mind sending it by e-mail? (dixiegrace.mendoza@gmail.com)
DeleteI "pinned" this design on Pinterest a while back and just made it for my great nephew's 4th birthday. There was so much excitement that I'm not sure he got the full effect, but it was so cute that I used the card alone on the gift, instead of ribbon & bow. Thanks for the easy tutorial.
ReplyDeleteBK, yay! Pinterest pay off. My pleasure!
DeleteHi, sayasighosh, it's my pleasure. I'm glad you had fun with it!
ReplyDeleteHi! :) could you please send me too the pdf file in e-mail, because i can't download this unfortunately :( here is my e-mail adress hannaborcsa@gmail.com
ReplyDeletehello :) could you please send me the printable template, to this e-mail: hannaborcsa@gmail.com, because I can't download it. Thank you!
ReplyDeleteadorable !
ReplyDeletetrès jolie carte, merci pour ce partage
ReplyDeleteBonjour,
ReplyDeleteMerci pour ce joli partage
Can you send the pdf to me =D ? Thank you for your sharing.
ReplyDeleteWe just made this, so easy and probably the cutest card I have ever seen...bought or otherwise. Thank you for enriching our lives with your wonderful craft!
ReplyDeletethank u for great ideas........sooo sweet, cute and creative..
ReplyDeleteJust made this for my grandson's 3rd b-day!
ReplyDeleteI would love to make this craft. Could you send me the pdf template? emfeyh@gmail.com
ReplyDeleteCan you please send me PDF file on my email? My I'd is dave.ankita@gmail.com
ReplyDeleteIt looks like this guy came up with exactly the same craft as you and a lot of other crafters on the web -http://www.zeeq.in/the-art-room/origami-and-paper-quilling/puppy-greeting.html
ReplyDeleteWhat a beautiful job! Could you send me the pdf template, please?? I can't download file. Tks! ^^
ReplyDeleteThanks a lot! The card it’s beautiful, I just love it.. =)
ReplyDeleteSuper mignon merci beaucoup !!
ReplyDeleteexcelente idea algo asi necesitaba realizar, muy bueno, me encanto, muy buena pagina y sus ideas.
ReplyDeleteGer Ag, muchas gracias! :0)
DeleteThanks for the great tutorial. Instead of writing "pull", I drew an arrow pointing downward and it does double-duty as part of the tongue! Plus, it's multi-lingual.
ReplyDeleteNow why didn't I think of that? *slaps forehead*
Deleteamazing I will make one for my Aunty right now
ReplyDeleteThank you so much! The printables and clear instructions made it really easy. Made this with my son for his friend's birthday. Quite pleased with our work!
ReplyDeleteomg! These are so cute! MY mom loves dogs so im makingit for her birthday!
ReplyDeletethanks!
DeleteThanks! Super cute!
ReplyDeleteThank you so much! My sister's birthday is soon and she loves dogs so this was the perfect card!
ReplyDeleteExcellent! My pleasure. :-)
DeleteThis was a great gift for my dad. He loved it!
ReplyDeleteI'm so glad you both enjoyed it! :-)
DeleteMy ears don't flap back. I've tried making them havier by pasting an extra piece of paper on the inside, but it doesn't really seem to work?? They're still a bit opened, not flat closed.. or is that normal?
ReplyDeleteHey Arianne, mine don't sit completely flat, but they sit flat enough (see photo in post). If yours don't flip down it could be you need to score the fold of the ears better or maybe the card stock you are using is too thick. I hope that helps! :-)
DeleteI thought I would add, gravity and not the action of the card makes the ears flap back down. The ears won't fall back down unless you hold the card up. :-)
Deletemine is not opening fast and it is not straight
ReplyDeleteHi, Samuel,
DeleteIt's hard for me to troubleshoot your card unless I can look over your shoulder. Be sure you've followed all the directions carefully. :-)
Thank you, my 5year old really liked it
ReplyDeleteOh good! :)
Deletethank you so much my brother loved it thanks for making it easy!
ReplyDeleteMy five year old brother Loved It. Thanks, I'll always check out more crafts from you
ReplyDeleteLOL
ReplyDeleteits so good
ReplyDeleteNice! I am using it for my baby sister’s birthday! She’s 2. Pls also visit vanyadreamz.blogspot.com
ReplyDeleteI just stumbled across this. It's perfect for my nephew's birthday. Looks just like his puppy!
ReplyDeleteHello, such a cute card! Unfortunately the PDF link isn't working for me. Could you please send it to me via e-mail? Judith.ebe@gmx.de
ReplyDeleteMany thanks!
I loved making this card! Thanks for the creative idea :-)
ReplyDeleteYour card is so cute... thanks a lot for the instructions and your free pdf... i love it!
ReplyDeleteMy 4-H club is making craft kits for children who are in the hospital. Wondering if it would be okay for me to use your idea. I will list this website on the handout--they don't want to have to use a device to get to the instructions so I would print them out (including your photos) and include all of the supplies needed for children to do the project.
ReplyDeleteHey there, as a free project for your 4-H club this is fine. :-)
DeleteNice job!
ReplyDeleteBuenos días! Maravilloso perrito. Ya había estado por acá y me lo había llevado pero lo perdí. Así que agradezco otra vez. Que tengas un bello día.
ReplyDeleteGracias por el blog cargado de tanta información.
ReplyDeleteThanks so much!
ReplyDeleteI am using this to make my dad's birthday card!!!
can you do it without printing the sheets off?
ReplyDeleteNo, a printer is required! :-)
Delete